
Note: this is a draft version (#1). I'm hoping to add some more photos. Please let me know if any of if seems unclear or hard to follow and I'll try to fix it.
A few years ago I started experimenting with tiller designs. My boat had come with a fairly conventional "Gougeon Style" tiller that always seemed to be in the way. The first project was one of those curvy laminated tillers. It turned out nicely, but after sailing with it for a season, I decided it was too wide to allow comfortable "knee-steering". I did discover that I liked the much shorter length so than when I slid the tiller all the way forward my steering arm was almost straight out along my body, giving a more comfortable and low-drag position in the boat
At this point in time a friend and I were building new hulls, and paying close attention to cockpit dimensions and ergonomics. As part of this exercise, we experimented with various tiller lengths and shapes. Our favorite design turned out to be a shortened "Gougeon Style" tiller. It was narrow enough to fit between our knees comfortably and a properly placed "bump" gave us good knee-steering ability.
Faced with the (daunting) prospect of creating and assembling all the fiddly bits that make up a hollow "Gougeon Style" tiller, I decided to try and find an alternative. I'd made plywood-faced, foam-core panels for various projects, so I was familiar with how easy they were to construct. The match between the OD of the square Aluminum tiller-tube and the readily available one inch thick pink construction foam seemed too perfect to ignore. After a bit of experimentation, I came up with a way to quickly build the main portion of a tiller from a slab of foam and a few pieces of 3mm plywood. Two of these tillers were used all of the 2005-2006 season and held up very well. Both are still in use.
Don't be put-off by the length of the instructions. Building one of these is really a fairly quick process. The main steps are:
This works out to about three or four evening-length shop sessions: steps 1 & 2; step 3; steps 4 to 6; and finally step 7.
Simplicity is the keyword here. The main body of the tiller is assembled from one piece of foam and four pieces of 3mm plywood. There are no jigs required for assembly. The only special tools are a bunch of $1 spring clamps and a length of 1"x1" square-tubing to fill the tiller-tube cavity and act as a form for the box at the front of the tiller; a spare tiller-tube works fine for this.
The first step is to cut out a piece of foam. I've used a table-saw and a band-saw for my blanks, but you could probably get away with using a utility knife. The one area that's important is to have a nice straight edge on the top, with a good 90° angle between the sides and top surface.
The profile of the foam looks like:
The overall length (36") and width (4") are non-critical dimensions. I generally make it a bit oversize. The 1" cut-out and 1/8" step are fairly critical. The length of the cavity (23") is sized to allow a normal-length Sarns tiller tube to slide almost all the way into the tiller. If you have a different length tube you can adjust the distance as needed. Similarly, if you want a longer or deeper tiller, you can change the 36" length and 4" width to suit your needs.
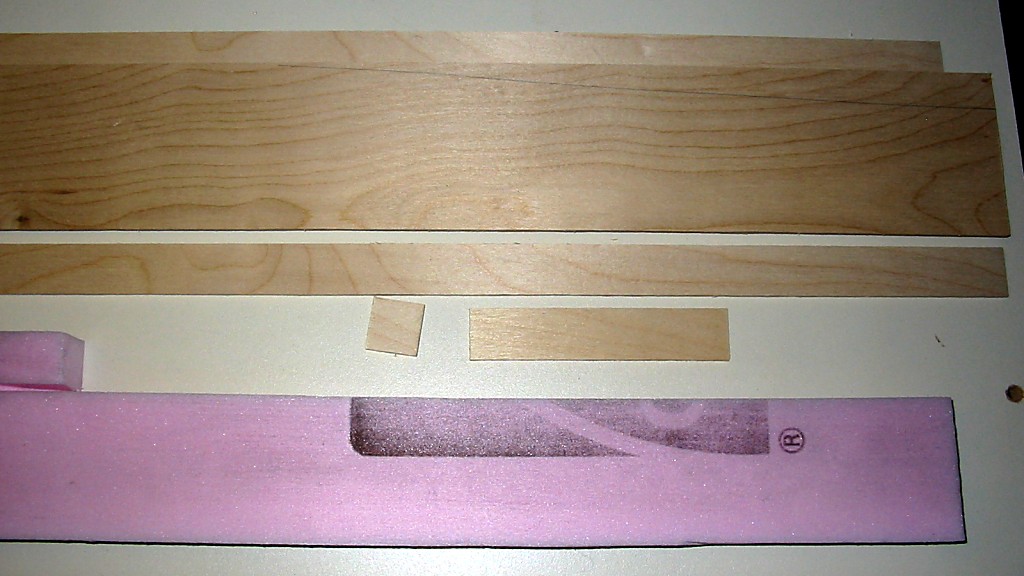
The plywood pieces are pretty simple. You need two sides, 36"x4"; one top, 36"x1"; and the bottom at 6"x1", As with the foam, the dimensions are adjustable to fit your needs. Many people are uncomfortable with a 6" long box transferring all the loads from the tiller to the Aluminum tube, so they will lengthen the bottom piece (and corresponding step in the foam).
Here are all the pieces laid out before assembly. At the top of the photo are the two sides, beneath is the top, with the bottom and a small piece for a stopper at the inside end of the cavity next (which I don't use anymore); the foam is at the bottom.
This piece of foam is from my first tiller, and I hadn't cut out the step for the bottom 6" piece of plywood yet.
The Aluminum tube needs to be covered to prevent it from being glued into the tiller. I suppose that careful waxing might work, but I've always just wrapped the tube with wax-paper over it's entire length; you need to have it filling the entire cavity, so there's something to resist the clamping pressure. Resist the temptation of tape it too securely. You'll have a terrible time pulling the tube out of the cured tiller-blank! What I've found works best it to cut a piece of wax paper the length of the Aluminum tube and just wide enough to overlap by about 3/4" when it's wrapped around the square tube. Leave about 2" extending past the end of the tube that will be inside the tiller blank. I take two really tiny pieces of masking tape (about 1/2"x1/4") and place one a few inches from the end of the tube, and the other so it will end up a few inches inside the tiller-blank. Tape one edge of the wax-paper so it's about 1/4" from the side of the tube. Carefully wrap the wax paper around the tube as tightly as you can, creasing it carefully as you go around each corner. When you're done, the edge of the wax-paper should end up about 1/4" from the edge of the tube, and overlapping the first layer by about 1/2". Tape the wrap securely at a point that will end up outside the tiller blank, and then fold the excess on the other end inside the tube; that will hold it in place enough, and not require another piece of tape.
Assembly is pretty easy. The first step is to sand the foam with 60 or 80 grit sandpaper so the epoxy will bond well. Cover a flat surface that's at least as long as the tiller with some wax paper. Lay out a bunch of spring clamps (15-20 is about right).
The first real assembly step is to coat all the surfaces with neat epoxy. Don't go overboard; the only surfaces that need to be glued are:
After the neat epoxy, mix up some cotton-fiber thickened epoxy and spread it on one side of every pair of surfaces (I usually apply it to the foam). Make sure you get good coverage of both the neat and thickened epoxy on the edges of the plywood top and bottom strips to make sure they bond well to the sides.
Now comes the fun part! After making a half-dozen tiller blanks, I still haven't come up with a really good assembly sequence. The glue makes everything want to slide around until the clamps are applied. I usually lay one of the sides down on the wax-paper covered table, glue side up. Next I lay the foam on it, leaving a little bit of plywood above the top of the foam. The short bottom piece goes into it's cut-out area. The Aluminum tube is set in place and the top-piece is added. Leave the Aluminum tube about 1/4" from the end of the cavity. When the glue is all cured, you can break the tape by standing the tiller on the floor with the Aluminum tube up and carefully tapping the tube into the tiller blank - it's much easier than trying to pull it out directly. Finally, lay the top side over the whole assembly. Lift the blank up and set it down on it's top (narrow edge). Push down on the foam to set top-piece even with the top edge of the two sides, and make a good bond between the top and foam. At this point I usually add a few clamps to hold things together. With the clamps on, turn the tiller over and set it down on the clamp handles. At this point you can check that the top-piece is even (or slightly below) the side edges along the entire length. At the same time, try and make sure the top-piece, sides, and bottom all end evenly (within ~1/16"). With only a couple of clamps on, it's possible to shift things around a bit, if necessary. Then I start adding clamps. First I add a number of clamps near the top of the sides to make sure there's a good bond between the sides and top; this is especially important over the 6" where the plywood box is formed. Then I add more to clamp everything together. The assembly is pretty stable at this point, but I usually try to leave it alone while the epoxy hardens.
Here is an example of the clamps applied to my first tiller. In this case I had cut an approximate profile in the sideboards before gluing. All my more recent tillers are glued up with the rectangular sides, and trimmed to profile afterwards.

When the epoxy is cured, take off the clamps. The first step is to remove the Aluminum tube. If you left a gap between the end of cavity and the tube, you can usually stand the blank on the floor and tap the end of the tube with a mallet to break the tape; after that you should be able to pull the tube out pretty easily. Don't worry of there's some wax-paper left in the cavity. You can remove it later when you're fine-tuning the fit of the real tiller-tube and the tiller. Until you wrap the tube/box at the forward end of the tiller in fiberglass it is fairly fragile; the glue-joint is only the thickness of the plywood (1/8"). The only time I've had a problem is when I was pulling the tiller-tube out, and wiggled it a bit too much (and it's easy to fix a split by re-gluing). Once the tube is out, resist the temptation to play with the blank too much until you've wrapped the end.
Wrapping is pretty easy. First I just cut away the end of foam/plywood sandwich for about 6" from the end, and close to the piece of plywood that makes up the bottom of the box; I've used both a hand-held saber-saw as well as a band-saw to trim the blank. I usually cut parallel to the box for about 6" and then just cut to the bottom of the blank in fairly tight curve. You could cut the final profile out at this point, but I usually wait until I have the end wrapped in glass to reduce the possibility of splitting the glue-joints. I use a belt-sander to remove the last bits of the sides down to the plywood top and bottom pieces. It's quite easy because the sanding goes quickly when all you're removing is two 1/8" wide plywood edges and some foam, but stops nicely when you get down to the plywood face. Round over the edges pretty aggressively (ca. 1/8" radius), so the fiberglass can conform to the corner; I usually just do this by hand with some 80 grit sandpaper.
Cut out a piece of 6 oz. fiberglass cloth that's a bit longer than the box, and wide enough to wrap at least two times around the tube (three times around isn't a bad idea). Also cut out a piece of wax paper larger than the fiberglass to wet it out on. Mix some neat epoxy and paint it generously over the outside of the plywood tube. Lay the fiberglass on the wax-paper and wet it out thoroughly. Use the wax paper to help transfer the fiberglass to the tube. Start wrapping the glass around the tube just like you did with the wax-paper earlier; peel it off the wax paper as you go. Let the glass extend past the end of the tube. Keep the glass as smooth against the tube as possible. You may find the first attempt is a disaster. If you have a second piece of fiberglass and wax paper ready to go, you can just toss the first piece and try again without too much trouble (don't ask me how I know that...). When you have the glass wrapped around take a roll of cheap electrical tape and start wrapping it around the tiller blank. Get it started on the section away from the fiberglass and then start spiraling over the glass. Overlap about 1/2 the width of the tape. Pull it fairly tightly, but be forewarned that the glass with be a slippery mess and it may take an inch of wrapping before things get stable enough that you can pull a lot. You don't need much pressure anyway. As you spiral along, you'll force most of the excess glue out of the laminations, so be prepared for some dripping. Wrap right up (and even a little past) the end of the tube, then double back a few inches to solidly secure the tape to itself. The final step is to take a craft-knife and poke small holes in the tape (a couple per side, per wrap). The last bit of excess glue will ooze out these holes.
Set the unit aside until the glue sets, then unwrap the electrical tape, and you should have a tightly wrapped fiberglass layer over the plywood. There will be some spiral marks in the surface from the tape, but you can sand them out easily (if you want - my tillers still have them showing...). Trim the excess glass that overhangs the end of the blank and sand the end square if necessary. If you want, you can add a couple of extra wraps of Carbon-fiber or glass around the very end of the tiller.
When the wrapping it done and the glue has cured, you can mark and cut out the profile. I usually do this using the same tool that I used to expose the end of the tiller: a saber-saw or band-saw. I won't suggest a profile, although you can see my favorite shape in the photo above. I do the final shaping on a stationary belt-sander, or with a sanding drum chucked into my drill-press.
At this point I usually also fit the box to the tiller-tube I plan to use with the tiller. So far, every tiller I've made has been tight, and required a bit of "tuning" to fit snuggly around the Aluminum tiller tube (even when I used the same tube as the form to glue up the tiller). Usually only the 6" long plywood box needs adjustment, and I've found a few swipes with rasp/file works well. Pay careful attention to the inside corners of the box.
The handle end of the profile is important. You attach the handle by leaving a 1" wide and 2" long "tab" sticking out of it. You should trim the body so there is a 2" long section that is as high as your handle's thickness. For example, I like thin handles, so I make mine out of 1/2" plywood. I leave a 5/8" piece of the tiller side so that I have a 1/2" deep pocket to glue my handle into. Finally, I cut the foam out of the handle-end of the tiller to leave a 1/2" deep by 2" long cavity for my handle.
Handle shape is another personal preference. As I mentioned above, I like thin handles (1/2" thick), but many of my friends seem to prefer thicker ones. You could make them out of almost anything, but plywood seems to be the best material. I've always just laid-out the shape on a piece of plywood, cut it out, and rounded the edges by hand with sandpaper. You could probably also use a router and round-over bit.
Once you have a handle that you like, it's a simple matter to trim the "tab" to fit snuggly in the spot you created in the end of the tiller and glue it in place. A spring clamp is all you need to hold everything together.
All that is left is the final finish. My preference is simplicity, so all I've ever done is sand the tiller smooth and coat it with epoxy (and maybe a coat of varnish). If the exposed foam on the bottom of the tiller bothers you, you could paint it, or glue a layer of thin veneer over it.